Lets Animate with Corel Rave
Good
evening Ladies and Gentle men,
I
want to use this blog to educate us on how to do a simple animation with Corel
R.A.V.E.
Tutorials on
Corel R.A.V.E. and User Resources
What is Corel R.A.V.E.:
Corel
R.A.V.E. (Real Animated Vector Effects) a vector-based animation application
that comes as part of the CorelDraw Graphics Suite (starting in version 10). It
has the ability of creating interactive object-based animations and movies for
the Web. Your movies can be exported as Macromedia Flash (SWF), GIF animations,
AVI movies for Windows, and QuickTime formats. Here you'll find tutorials and
information on working with Corel R.A.V.E. 2.0™
The hardest side of the any
animation process is the planning stage, first you need to have basic idea of
what you want to design, how you want the objects you designed to behave.
Creating the actual animation is very simple.
In this tutorial I will be starting from basic for those
that has no knowledge of Corel R.A.V.E. 2.0™ also I will try to explain myself
in details with Images (Possibly)
Do
not go after my poor English write-up, just focus on the practical’s thanks
Lest
I forget call me “Moorch Moore”
INTRODUCTION TO
COREL R.A.V.E. 2.0™ AND ITS ENVIRONMENT
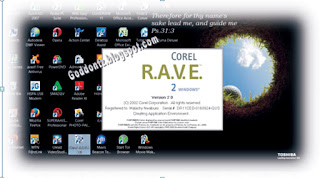
How To Open Corel R.A.V.E. 2.0
1.
Click on Start Menu Icon,
2.
Place you cursor
on all programs
3.
Scroll to Corel
graphic suite 11, the click to Corel R.A.V.E 2.0 to open the
designing Stage.
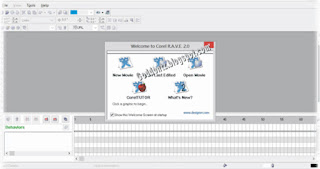
Once you see Welcome to Corel R.A.V.E. 2.0 dialog box, it means you’re ready to use the application.
In the Welcome to Corel R.A.V.E. 2.0 are 5 Icons Namely
In the Welcome to Corel R.A.V.E. 2.0 are 5 Icons Namely
- New Movie
- Open Last Edited
- Click the Open Movie
- CorelTUTOR
- What’s New?
i. Click the New Movie to start a fresh animation design (from Scratch)
ii. Click Open Last Edited to restart your last animation work (continue where you stopped)
iii. Click Open Movie to open any animation design saved in your computer (open an existing file).
iv. Click Corel Tutor, to learn how to use some task on R.A.V.E (Step by Step approach).
v. What’s New: teaches about the latest features you can find in Corel rave. 2, including timeline enhancements, symbols support etc.
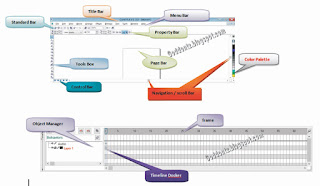
In Corel R.A.V.E. 2.0 we have some components that goes with it, like:
Page or Stage: it is a virtual adjustable paper usually portrait and in white color. The Stage is where you design you graphic before adding animating effects.
Title Bar: This bar displays the file and programme name, it is normally located at the top most of the application.
Menu Bar: This bar has 11 menus namely File, Edit, View, Movie, Arrange, Effects, Bitmaps, Text, Tools, Windows and Help. From menu bar you can perform series of task like save, open insert new page, copy, cut, paste, movie setup, assistance etc.
Standard Bar: this bar serves as shortcut for menu bar, most of the items you get in menu bar are place in standard bar for easy usage.
Tools Box: this bar is located at the left side of the Corel R.A.V.E. 2.0. actually the tool box for designing graphics, without it design can’t be achieved.
Property Bar: it help in setting and adjusting each tools from Tool Bar.
Control Bar: it is use to Play, Stop, Jump, Fast Forward and Rewind Animation Movie.
Navigation Bar: Horizontal and vertical scroll bars, are use to move the page Up↑ Down↓ ←sideways→. Its use for swift control of the page.
Color Palette: the palette can be located at the right side of the window. There you get all the color to beautify your design etc.
Lets Do Some Simple Animation On Corel R.A.V.E. 2.0 tm Corel R.A.V.E. 2.0 ™
In the practice we are going to do an animation of a Bouncing Ball, all am urging you is just to follow me step by step, if you seems to be confuse, look at the image for follow-up.
Illustration 1:
i. open Corel R.A.V.E. 2.0 ™,
ii. double click at the edge of the white Stage to open page options
iii. click Movie Setup, at Width: type 300pixels and Height: 100 pixels. Leave the Resolution and Frame Rate at 96 and 12 per seconds
ii. Click Open Last Edited to restart your last animation work (continue where you stopped)
iii. Click Open Movie to open any animation design saved in your computer (open an existing file).
iv. Click Corel Tutor, to learn how to use some task on R.A.V.E (Step by Step approach).
v. What’s New: teaches about the latest features you can find in Corel rave. 2, including timeline enhancements, symbols support etc.

In Corel R.A.V.E. 2.0 we have some components that goes with it, like:
Page or Stage: it is a virtual adjustable paper usually portrait and in white color. The Stage is where you design you graphic before adding animating effects.
Title Bar: This bar displays the file and programme name, it is normally located at the top most of the application.
Menu Bar: This bar has 11 menus namely File, Edit, View, Movie, Arrange, Effects, Bitmaps, Text, Tools, Windows and Help. From menu bar you can perform series of task like save, open insert new page, copy, cut, paste, movie setup, assistance etc.
Standard Bar: this bar serves as shortcut for menu bar, most of the items you get in menu bar are place in standard bar for easy usage.
Tools Box: this bar is located at the left side of the Corel R.A.V.E. 2.0. actually the tool box for designing graphics, without it design can’t be achieved.
Property Bar: it help in setting and adjusting each tools from Tool Bar.
Control Bar: it is use to Play, Stop, Jump, Fast Forward and Rewind Animation Movie.
Navigation Bar: Horizontal and vertical scroll bars, are use to move the page Up↑ Down↓ ←sideways→. Its use for swift control of the page.
Color Palette: the palette can be located at the right side of the window. There you get all the color to beautify your design etc.

Lets Do Some Simple Animation On Corel R.A.V.E. 2.0 tm Corel R.A.V.E. 2.0 ™
In the practice we are going to do an animation of a Bouncing Ball, all am urging you is just to follow me step by step, if you seems to be confuse, look at the image for follow-up.
Illustration 1:
i. open Corel R.A.V.E. 2.0 ™,
ii. double click at the edge of the white Stage to open page options
iii. click Movie Setup, at Width: type 300pixels and Height: 100 pixels. Leave the Resolution and Frame Rate at 96 and 12 per seconds
notice the Stage will change from square to rectangle envelop shape.
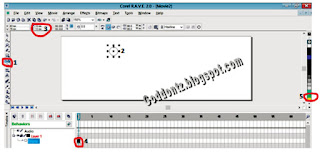
iv. Click ellipse shape at tool bar, then click and drag the ellipse to form circle shape at you page.(note: at the time frame bar a black circle shape is formed)
v. Go to property bar and type 13 at both Object Size to get equal round shape.
iv. Click ellipse shape at tool bar, then click and drag the ellipse to form circle shape at you page.(note: at the time frame bar a black circle shape is formed)
v. Go to property bar and type 13 at both Object Size to get equal round shape.

vi. Give it any color of your choice, mine is Green.
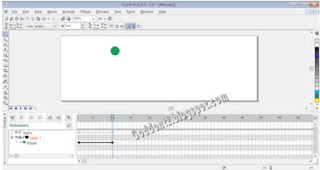
vii. At time frame label 4, click the Lifeline (black circle) and drag to 10.
viii. Double click the dot at fram10 to change to hollow block shape
ix. Click the ball at you white page and drag vertical Down
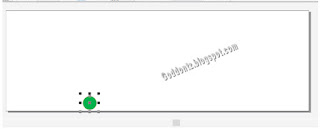
x. Click Menu bar, File, Save As, from the dialog box select the folder to save the file. Type the File name and click Save button. Your animation is ready to be tested.
xi. At the Menu bar, click Movie, select Control then click Play Movie to watch the ball bouncing. Good luck
Illustration 2
We are going to design another simple animation lets save it as Blink.
i. Open Corel R.A.V.E. 2.0 ™
ii. At Tool bar Double click Rectangle Tool to get the shape of the stage, from color palette give it color Black
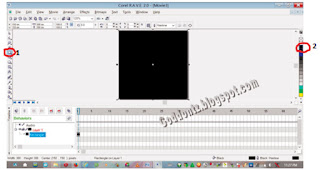
iii. Click the ellipse tool and draw a circle using property object size setting 148px. Click Red Color Fill and Right Click White Line Color
iv. Press Ctrl + C to copy the circle and press Ctrl + P to past it
v. Click the duplicated circle, go to property bar and change the object size to 110.
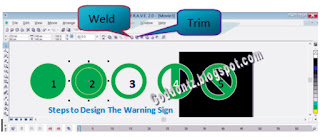
vi. Click the 2 circle shapes. At property bar click Trim, deselect the shapes then select the smaller circle and delete.
vii. Click Rectangle Tool and draw rectangle shape at the stage. At Property Bar Object Size Width type 36 and Height type 123. Select the circle and rectangle, press Key C and E to center the shape and Weld them.
viii. Select the Welded shape, at the Rectangle of Rotation, Type 45(Property Bar) to tilt the design.
Not e all we’ve been doing is design of a warning sign. Now let add animation to it.
ix. Select the black Rectangle background, At timeline bar click and drag the selected dot through 30.
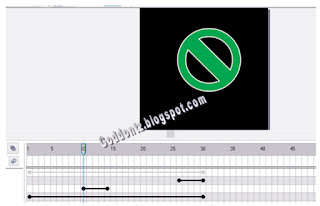
x. Select the circle, drag it to frame: 10 and 14.
xi. Press Ctrl + C, place you tracker to frame: 26 and paste to duplicate the warning sign.
xii. Change the duplicated shape to Red fill color from color palette.
xiii. Save and play the movie as we did in illustration 1.
Note: In Illustration 1, we used a hollow block square to create our animation, but in Illustration 2 we used the circular lifeline. It all depend on what you want to design.
Good Luck, enjoy


Comments